How to Fix a Bios Image
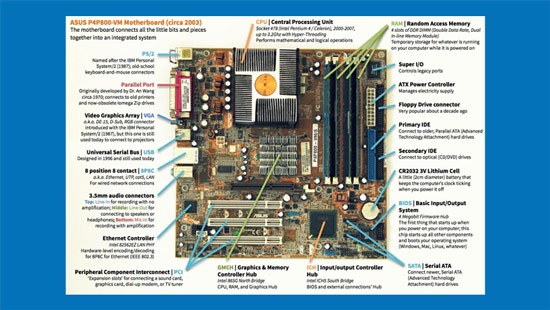
As we all become more modern, we are more attracted to digital technology. In this age of information technology, the most popular is the computer. But sometimes we have problems with this device. One of the problems is the image-bios problem. This makes it frustrating at times. BIOS is the Basic Input/Output System. Today we will discuss how you can fix a bios image. Let’s find out step by step.
Step 1: Find the problem
Before you can troubleshoot your computer’s BIOS, you first need to understand how BIOS problems start. If you can identify a problem, you will find a solution much faster. A BIOS problem usually occurs in your computer due to power loss during a BIOS update, corrupted BIOS update, failed BIOS flashing, etc. You may have to face this BIOS issue.
Step 2: Collect the necessary tools to repair the BIOS
Before you start the repair, make sure you have the right tools. You will need a USB flash drive with at least 1 GB of space, another computer that works and can connect to the Internet, the most recent BIOS update file from the website of the motherboard maker, and BIOS flashing software (if it’s not already included in the BIOS update file).

Step 3: Backup the computer data
Our computer contains a lot of important information that we don’t want to lose. So before doing all these things, make sure your backup file is. This will ensure that you don’t have to cause any inconvenience. However, although BIOS updates usually don’t affect your computer’s internal drive, it’s beneficial to be aware.
Step 4: Download the correct bios file
This step is very important to solving the BIOS image of your computer. The first step is to take a favorable look at your motherboard model. Read the instructions provided by your motherboard maker and download the most recent BIOS following the model check.
Step 5: Use a fresh pen drive

To fix the bios image, you need to take a fresh pen drive and insert the downloaded bios file into it. Get the BIOS update file and put it on the USB drive. Make sure the file is in the USB drive’s root location and not in a folder.
Step 6: Flash the BIOS
In the BIOS menu, navigate to the BIOS Update section. This group is usually called “EZ Flash,” “M-Flash,” or something similar. Select the BIOS update file from the USB drive. Follow the on-screen steps to start the flashing process. Do not turn off the computer during this process, as this may forever damage the motherboard. A BIOS repair
Step 7: Restart and verify
Your last step to fix the BIOS image is restarting the computer to help it start fresh. I hope you succeed. If not, you can try again by downloading a different version of Bios and reading the manual.
Conclusion
Our current lives are not complete without these modern things. You may find it very difficult to fix or repair your biographical image, but with a proper and careful approach, you can get rid of all this. You just need to be patient, read the manual well, and follow the steps from the manufacturer’s website. . You can reset your computer by following the steps above. thank you
READ MORE : Office download-Office download free
READ MORE : Office 21 activator – Office 21 activation key
READ MORE : How to create a Zoom meeting link step by step
READMORE : 7 easy steps: How to fix a spacebar on a keyboard
